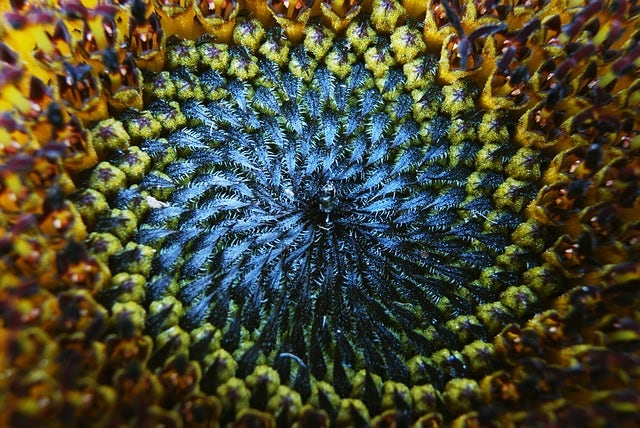
 The inside of a sunflower, captured in macro style
Macro photography is extreme close-up photography, often of small objects like insects or plants, shot larger than life size. It’s one of our favourite types of photography because of the detail and vibrancy these images can produce. National Geographic has been showcasing these images for decades.
The advent of digital cameras has dramatically altered the world of macro photography, making it much simpler and more accessible…In this article, we’ll walk you through how to take macro images: the definition, equipment and some other tips.
Micro, macro and close-up photography – what’s the difference?
How come it’s called macro photography if all the subject matter is micro? That’s a valid question. In fact, the terms micro and macro are sometimes referred to interchangeably in photography. For example, Nikon’s ‘micro’ lenses are actually for macro photography.
The main difference between macro and close-up photography is the magnification ratio and the lens. While macro photography is indeed close-up, macro images are taken using a special lens that has the capability of achieving at least a 1:1 ratio, sometimes up to 1:10.
In layman’s terms, macro lenses should allow photographers to capture rich, fine details – the eyes of a fly for example – whereas a close-up shot is just a very zoomed-in photo.
Equipment
Macro photography can be achieved with varying types of equipment, from affordable to incredibly expensive. The most effective method is to buy a dedicated macro lens, which also ranges in price.
It should be noted that, if you own a digital SLR or something similar, your lens may very well say ‘macro zoom’ on it. However, these lenses often just focus a little closer and are not true macro lenses.
With digital equipment getting better by the day it seems, sensational digital macro images are now possible with the press of a button, provided you have the right gear.
Gone are the days when you had to manually add a dioptre lens in front of your existing lens; gone too are the fiddly components you once had to install between your camera body and the lens; and for those who used to literally reverse their lens with a reversing ring to magnify the shot, you can all rest easy.
When considering a macro lens, it’s important to check the focal length and the aperture. A 100mm length is a good start although these types of lenses can extend up to 200mm. The higher the length, the further away you can be from your subject matter, which can be beneficial if you’re trying to capture a jumpy insect.
Aperture around 2.5 is fairly standard and should be more than enough, especially if you’re using the lens for recreational purposes only.
Now for a few examples. For ease of consistency, we’ll pretend we have a Canon DSLR:
- For beginners, this Sigma 50mm, f/2.8 lens is a good starting point.
- For all around proficiency and performance, we reckon this Canon 100mm, f/2.8 macro lens is a sure bet.
- For the real professional, it’s hard to beat the powerful Sigma 180mm, f/2.8 telephoto lens.
If you’re not currently looking to buy a new lens, you can always try fitting an extension tube, which puts space between the camera body and the lens.
Tips to great macro photography
Depth of field: macro photos have quite a flat focus, meaning that if you’re photographing a subject that can’t be arranged more or less on the same plane, you will have to choose which parts you want in focus.
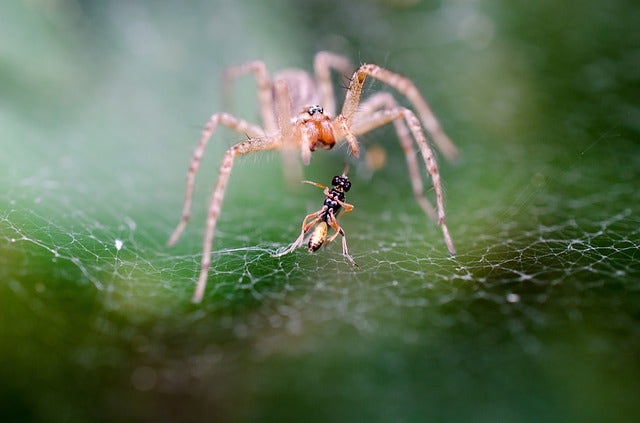
Take the picture of the spider battling its prey (above). While its still a great photo, notice how the spider is mostly out of focus? Because macro shots are quite flat, changing the angle to a more birds-eye-view would allow you to capture the spider in more detail.
The best macro photography, regardless of camera, requires small lens aperture to gain optimum image sharpness and depth of field. But this requires more light so be sure to extend the exposure time to take a correctly exposed photo.
It can be fun and potentially rewarding to experiment with wider/larger lens apertures, which will throw more of the subject out of focus and might produce pleasing artistic effects.
Our final tip is to keep your lens in pristine condition; we recommend visiting our blog post on how to maintain and clean your camera lenses for more information.
If you’re keen on trying out macro photography, you can also check out our full range of macro camera lenses and DSLRs today.