
It’s easy to get carried away with editing photos. Post-processing programs like Lightroom and Photoshop are so innovative that you can feel almost powerful over your own photography. There are so many ways you can improve your photos through editing.
A simple slider can transform a dull, colourless photo into a vibrant image or a dark photo to a bright one.
But too much editing can produce a clearly over-processed photo; it’s a fine line to know when you’ve gone too far.
How much post-processing is too much? There are some obvious signs to look out for that will tell you when you need to dial back the enthusiasm.
1. You’ve lost detail in your image
Your images look lifeless, without contrast or texture.
The problem: Chances are, you’ve increased your contrast too high, resulting in over-darkening or over-whitening.
A bit of contrast adds definition. Over-contrast your photos and you lose all the detail in your shot. Try using curves to add contrast instead of the sliders in your image and if you’re using Photoshop, make your adjustments on an adjustment layer rather than on your original layer.
2. Colour tones don’t match
If your colours look off, it’s possible they don’t complement one another.
The problem: Most of the time, the colours don’t match when you’ve tried to split tone your image, editing the colour of shadows and highlights separately.
You can fix odd-looking colours by keeping your colours in the same tone, using your own eye and the colour frequency chart. Make sure your monitor is calibrated properly as well.
Alternatively, it could be that different light sources are introducing different temperatures into the room, challenging your white balance.
If that’s the case, you might need to edits parts of the image separately - or try converting your photos to black and white.
3. The photo feels claustrophobic
There’s not enough negative space in your composition.
The problem: You’ve probably cropped your photo excessively, leaving little room for the different elements to breathe. Undo the crop and try instead to compose your photos according to the rule of thirds.
4. Your image is unnaturally colourful
If you have a riot of garish colours in your image, it becomes a distraction from the main subject.
The problem: You’ve probably gone a little trigger-happy with the saturation and vibrancy settings. Saturation adjusts every colour equally while vibrancy raises the vividness of the least saturated colours.
Over-saturation in photography is common but it’s best to try not to use saturation too much; vibrancy is easier to control and the changes are less obvious. Even then, move the slider up to the extreme end of vibrancy and watch the image as you dial it back down until you hit a subtle, almost neutral tone.
When you’re adjusting separate colours in Lightroom or Photoshop, watch the histogram to see when you’re clipping individual colours through oversaturation.
5. Your image resembles a video game
Instead of a realistic portrayal of your scene, your photo shows severe details and highlights, resembling a comic strip or video game.
The problem: Have you cranked the HDR settings up too high? HDR, or high dynamic range, brings detail into the shadows and highlights. As with all things, moderation is key.
6. There are light halos around your subject
There are strange halos around the stronger lines in your image, where the colour and exposure seems to be brighter than the rest of the shot.
The problem: Halos can be caused by over-sharpening or over-contrasting your image.
Many people will try to save unfocused images by sharpening; if it was unfocused in the lens, there’s nothing you can do about it.
To sharpen a focused image further, zoom in 100% so you can more clearly see the changes you’re making.
In Photoshop, use a high filter pass to sharpen the edges and texture of your image without affecting smoother areas (such as the sky). The high filter pass gives you greater control; try to keep the number between 10 and 11.
Alternatively, you could have gone extreme on contrast, which not only causes halos but also harsh outlines. Read on to find out how to better control your contrast.
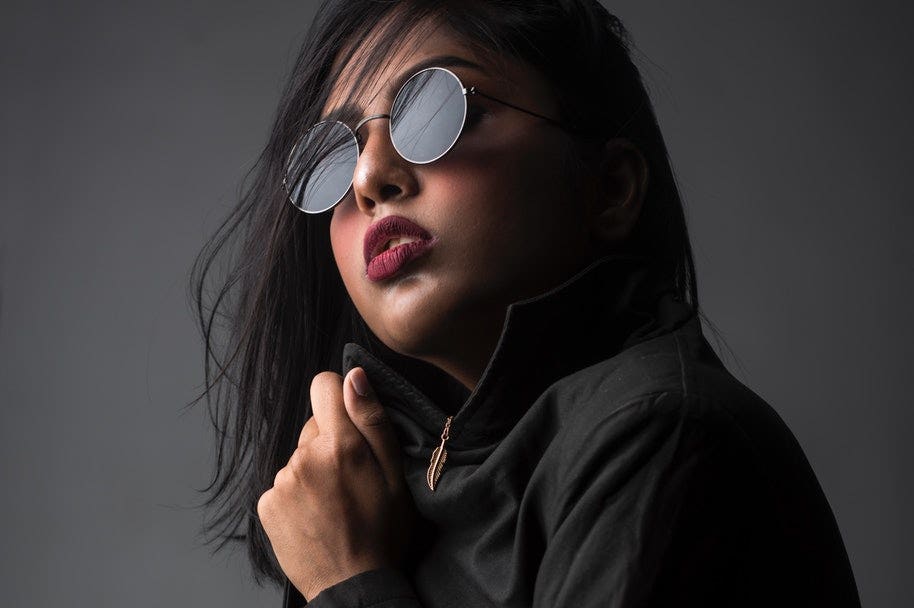
7. The people look unrealistic
Tic-tac white teeth, sparkling eyes, and Barbie smooth skin are all signs that you might have overdone it in Photoshop.
The problem: Porcelain-smooth skin normally happens when you’ve slid that clarity slider too far to the left, losing natural lines, wrinkles, and texture in the skin.
Instead, try softening reds or removing individual blemishes to keep the photo realistic while still being flattering. Alternatively, zoom into the image and increase the clarity gradually until you bring more texture and shadow into the skin.
8. Your image has harsh outlines
The outlines in your photo come on a little too strong, looking unnatural.
The problem: It’s possible you’ve been just a little too excited with the clarity slider. Sure, it adds a little punch in the details and textures. But it quickly becomes obvious when you use it too much.
Instead of applying a sweeping clarity slider to the whole photo, try using an adjustment brush and simply painting clarity onto those areas you want, such as a subject’s eyes.
9. There’s too much noise
You seem to have more noise in your photo than you intended, making it appear grainy or blurry.
The problem: You might have tried to raise the exposure on an underexposed scene just a little too much. Lifting shadows, increasing saturation, or over-cropping can also cause noise.
This is why it’s always better to work with a RAW file or with lower ISO settings since both of these contain a lot more data in your image; it’s less likely your image will degrade as quickly in post-processing.
The adjustment brush might help reduce noise in different parts of the image that need it most. But it’s still best to get the exposure right when you’re taking the shot.
Don't forget this important tip...
We don’t blame you for getting carried away with your image editing. Post-processing is fun! But with these few tips throughout this article, you can hopefully avoid creating an image that looks high-tech or unnatural.
On a final note, make sure you’re editing in a separate file to the original. Destructive editing is when you write over the top of the original file and eliminate source material.
And if you want to know more about post-processing, check out our other articles on the Camera House blog today.